Introduction
Welcome! ✨ Glad to have you here! 😄
In this short, sweet, and simple tutorial, we will build a chatbot that can answer questions on your data, with support for continuing conversations using chat history and caching responses to frequent queries, all in under ten minutes! 😎
So, let’s jump right in. The timer starts now! ⏱
Tutorial
In case you’re not familiar with it, QvikChat is an open-source framework that provides you with a solid foundation to build powerful AI-powered chat service endpoints quickly and efficiently. It includes support for open-ended or context restricted chat, chat history, response caching, authentication, and information retrieval using Retrieval Augmented Generation (RAG).
In this tutorial, we will use QvikChat to set up a chat server endpoint that answers user queries using a large language model (LLM) and some additional data that we configure the endpoint to use. We will also add support for chat history so users can continue conversations if they want to, and for response caching so that API calls to the LLM provider can be reduced and responses can be generated faster for frequent queries.
Project Setup
The easiest and fastest way to get started with QvikChat is by using the QvikChat Starter Template.
The starter template is a pre-configured project with all the necessary configurations and setup to get you started with QvikChat to write quality and reliable code. It comes pre-configured with support for TypeScript, ESLint, Prettier, Jest, SWC, and GitHub Actions, so you can get started with developing the next revolutionary chat app right away.
Begin by cloning the QvikChat starter template.
git clone https://github.com/oconva/qvikchat-starter-template.gitIn case you don’t wish to use the QvikChat starter template, you can also install QvikChat as a package from NPM using the command below:
npm install @oconva/qvikchatOr
pnpm add @oconva/qvikchatQvikChat is best used with TypeScript. So, if you are installing the QvikChat package directly into your project or starting from scratch, please ensure your project is setup to use TypeScript. Check the Getting Started guide in the QvikChat documentation for more information.
Setup Environment Variables
Once you have cloned the starter template, add the API key required to access LLM models. By default, QvikChat uses Google’s Gemini API for text generation and embedding models. If you don’t yet have a Google Gen AI API key, you can get one from Gemini API - Get an API Key.
Create a .env file (or rename the .env.temp file present at the root level) and add your API key to this.
GOOGLE_GENAI_API_KEY=You can also use OpenAI API instead of Gemini API. You’ll have to provide your OpenAI API key as the OPENAI_API_KEY environment variable and configure your chat endpoints to use the OpenAI model. To learn more about configuring chat endpoints with a custom LLM model, check here.
Install Dependencies
Now, you can install all required dependencies using the command below:
pnpm installOR
npm installObtain Test Data
For the chatbot to be able to answer questions using your data, we will need to process the data first. We won’t go into details about how this works behind the scenes, but essentially, all the data is converted into vectors of a specific dimension and stored in a vector store. A query is then also converted into vectors of the same dimension, and we search through the vector store and look for the closest vectors (i.e., those with the lowest relative distances). To learn more about how RAG works in QvikChat check the RAG Guide.
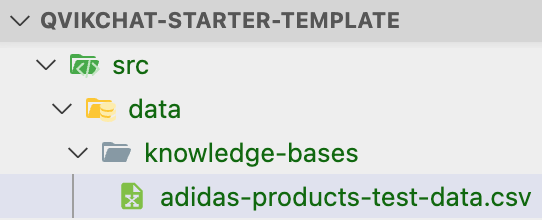
For this tutorial, I’m going to use a CSV file containing test data that contains information regarding Adidas products. You can download the test data from here: Adidas Products Test Data, or you can use your own data file.
Place the data file in the src/data/knowledge-bases directory as shown below. This is the data that the chat endpoint we’re going to configure in this tutorial will use to answer queries.
Build the Chatbot
QvikChat provides a convenient way of creating chat services and deploying them through a server so that they can be easily accessed from anywhere like any other API.
It involves two simple steps:
- Create endpoint configurations: First, we create a configurations object that defines the configurations for the chat endpoint we want created. Through these configurations, you can easily turn on and off advanced features like chat history, API key authentication, response caching, Retrieval Augmented Generation (RAG), and more in just a few lines of code. 🙌
- Configure and run the server: Once the configurations for all the endpoints you want created are defined, you can use the
configureAndRunServermethod by providing it with the list of all endpoint configurations. This method will then create the endpoints using the provided configurations and then run the server. 🚀
Alright then, let’s configure our chat endpoint now.
Configure Chat Endpoint
To configure a chat endpoint, we need to provide an object with the configurations for the endpoint. These configurations include the endpoint name, the configurations for chat history, cache, RAG, and more. You can use the ChatEndpointConfig type provided by QvikChat to define these configurations.
In the code below, we define the configurations for the products chat endpoint. This chat endpoint will be used to answer questions related to the test products data. We will configure this endpoint to use chat history, cache, and RAG. For this tutorial, we will be using in-memory data stores for chat history and RAG, which are fine for testing but not recommended for production. You can also use Cloud Firestore, for more information, check QvikChat - Firebase.
You can add this code directly to your src/index.ts file. Don’t worry if you can’t completely understand what’s going on in the code below, we’ll discuss this code in detail in the section below.
import { type ChatEndpointConfig } from "@oconva/qvikchat/endpoints";
import { InMemoryChatHistoryStore } from "@oconva/qvikchat/history"
import { InMemoryCacheStore } from "@oconva/qvikchat/cache";

// Products chat endpoint configurations
const productsChatEndpointConfig: ChatEndpointConfig = {
  endpoint: "products-chat",
  enableChatHistory: true,
  chatHistoryStore: new InMemoryChatHistoryStore(),
  enableCache: true,
  cacheStore: new InMemoryCacheStore({
    cacheQueryAfterThreshold: 2, // cache response after same query is made 2 times
  }),
  enableRAG: true,
  topic: "Adidas Products",
  retrieverConfig: {
    dataType: "csv",
    filePath: "src/data/knowledge-bases/adidas-products-test-data.csv",
    generateEmbeddings: true,
    retrievalOptions: {
      k: 15,
    },
  },
};
Click here to see in-detail explanation of the code above
Let’s decipher what each of those configuration options do to better understand what’s going on here.
Endpoint:endpoint specifies the endpoint to which the POST requests for queries will be sent. For instance, in our case, the request should be sent to <server-url>/products-chat.
Chat History: To enable chat history, we need to provide two things.
enableChatHistory: A flag that can be used to enable chat history.chatHistoryStore: An instance of a chat history store that can be used to store and retrieve chat histories. In our tutorial, to keep things simple, we will use the in-memory chat history store, however, QvikChat also provides a Cloud Firestore-based chat history store. To learn more about setting up and using it check Firebase Chat History Store.
Cache: To enable chat history, we need to provide two things.
enableCache: A flag that can be used to enable cache. Caching allows for the ability to cache a response for a specific query so that the need to generate a response for that query using an LLM model can be avoided. This reduces latency in returning responses to user queries and also leads to cost savings as calls to LLM providers are reduced. However, since responses and queries both can come in unlimited variations, response caching may not always work. For simple queries though, the in-built caching support provided by QvikChat should be sufficient. To learn more about caching in QvikChat, check Caching.cacheStore: An instance ofCacheStorethat can be used to store and retrieve cached queries and responses. For simplicity, we will use an in-memory cache store, but QvikChat also provides a Firestore-based cache store.
RAG - Add Data: To enable RAG, we need three things:
topic: this is the topic of the chat, for example, in our case, this would be “product recommendation”. This is essential to avoid unintended use of the chat service, for instance, to prevent questions that are completely unrelated to products, like science or maths assignment questions.enableRAG: this flag is used to indicate whether RAG is enabled for the chat endpoint. RAG allows an endpoint to answer a user query using some additional context information, for example, this context information may come from a database or a file. As discussed earlier, to make this work, the data has to be converted and stored as vectors. These vectors are called embeddings and are generated using an embedding model. By default, QvikChat will use the default embedding model provided by the Gemini API. To learn more about how Retrieval Augmented Generation (RAG) works in QvikChat, you can check the RAG Guide.retrieverorretrieverConfig: When using RAG, we need to provide the chat endpoint the ability to retrieve additional context information from the knowledge base to answer the user query accurately. To do this, we can either provide the chat endpoint with a data retriever or the configurations needed to obtain a data retriever. Providing the configurations for the data retriever to the chat endpoint is the easiest way, but if you plan on sharing the data retriever (or, essentially the data) between multiple chat endpoints, it is better to create an instance of that data retriever. To learn more about configuring RAG for a chat endpoint, check the QvikChat documentation on the RAG Chat Endpoint.retrievalOptions: Optionally, you can also configure the way the data retriever should work by providing these configurations usingretrievalOptionsin theretrieverConfig. For example, in the code above, we explicitly set the number of documents to be retrieved to 15, where the default is 4. Such configurations would depend highly on the type of data you are working with and can be best deduced after thorough testing and analysis.
Configure and Run Server
Now that we have defined the configurations for our endpoint, we can use the configureAndRunServer method to configure and run the server. This method takes a list of all the endpoint configurations that we want to create and run the server with.
Update the code in your src/index.ts file to include the configureAndRunServer method with the productsChatEndpointConfig that we defined earlier, as shown below.
import { configureAndRunServer } from "@oconva/qvikchat";
import { ChatEndpointConfig } from "@oconva/qvikchat/endpoints";
import { InMemoryChatHistoryStore } from "@oconva/qvikchat/history";

// Products chat endpoint configurations
const productsChatEndpointConfig: ChatEndpointConfig = {
  endpoint: "products-chat",
  enableChatHistory: true,
  chatHistoryStore: new InMemoryChatHistoryStore(),
  enableRAG: true,
  topic: "Adidas Products",
  retrieverConfig: {
    dataType: "csv",
    filePath: "src/data/knowledge-bases/adidas-products-test-data.csv",
    generateEmbeddings: true,
    retrievalOptions: {
      k: 15,
    },
  },
};

// Configure and run server
configureAndRunServer({
  endpointConfigs: [productsChatEndpointConfig], // List of all endpoint configurations
});
Under the hood, the configureAndRunServer method will create the chat endpoint using the provided configurations and then run the server. It performs the following three steps in sequential order:
- Setup Genkit: Setup Firebase Genkit, either by using the default configurations or by using the configurations provided through the
genkitConfigparameter. You can use this parameter to enable additional Genkit plugins or to add a different LLM model. - Define Chat Endpoints: Define the chat endpoints using the configurations provided in the
endpointConfigsparameter. - Run the Server: Once Firebase Genkit is setup and the chat endpoints are defined, start an Express.js server to serve the endpoints. Use the default configurations for the server (e.g., for port number, cors, and other options) unless specific configurations provided for the server through the
serverConfigparameter.
To learn more about the configureAndRunServer method check the QvikChat documentation on configure and run server.
Test the Chatbot
Since we are writing our code in TypeScript, let’s first run the build command before we run our code.
npm run buildTo test the chatbot we can send a our question as an HTTP POST request to the configured products-chat endpoint. There are two simple ways you can do this testing. One is using the GUI interface and the second using the terminal. Choice is yours! 🫣
Genkit Developer UI
You can now run the Genkit developer UI to test the chat endpoints you define. Testing the endpoints using a graphical interface is probably the easiest way to get started. You can learn more about the Genkit Developer UI here.
Start the Genkit developer UI:
npx genkit startError starting Genkit Developer UI - port 4000 already in use
If you get an error while starting the Genkit Developer UI that states that port 400 is already in use, you can manually switch the port on which the Genkit Developer UI runs using the –port flag.
For example, the command npx genkit start –port 4001 will start the developer UI on port 4001.
In the Genkit Developer UI, you should be able to see products-chat in the Flows section on the left sidebar. On selecting it, you will see a text box displaying an object with the query property. As should be shown in the right sidebar of the developer UI, query is a required field for the input accepted by the products-chat endpoint. This is the field you can use to specify your questions. If all works well, on clicking the Run button, the response should be generated using the LLM and the data that we configured in the chat endpoint using RAG.
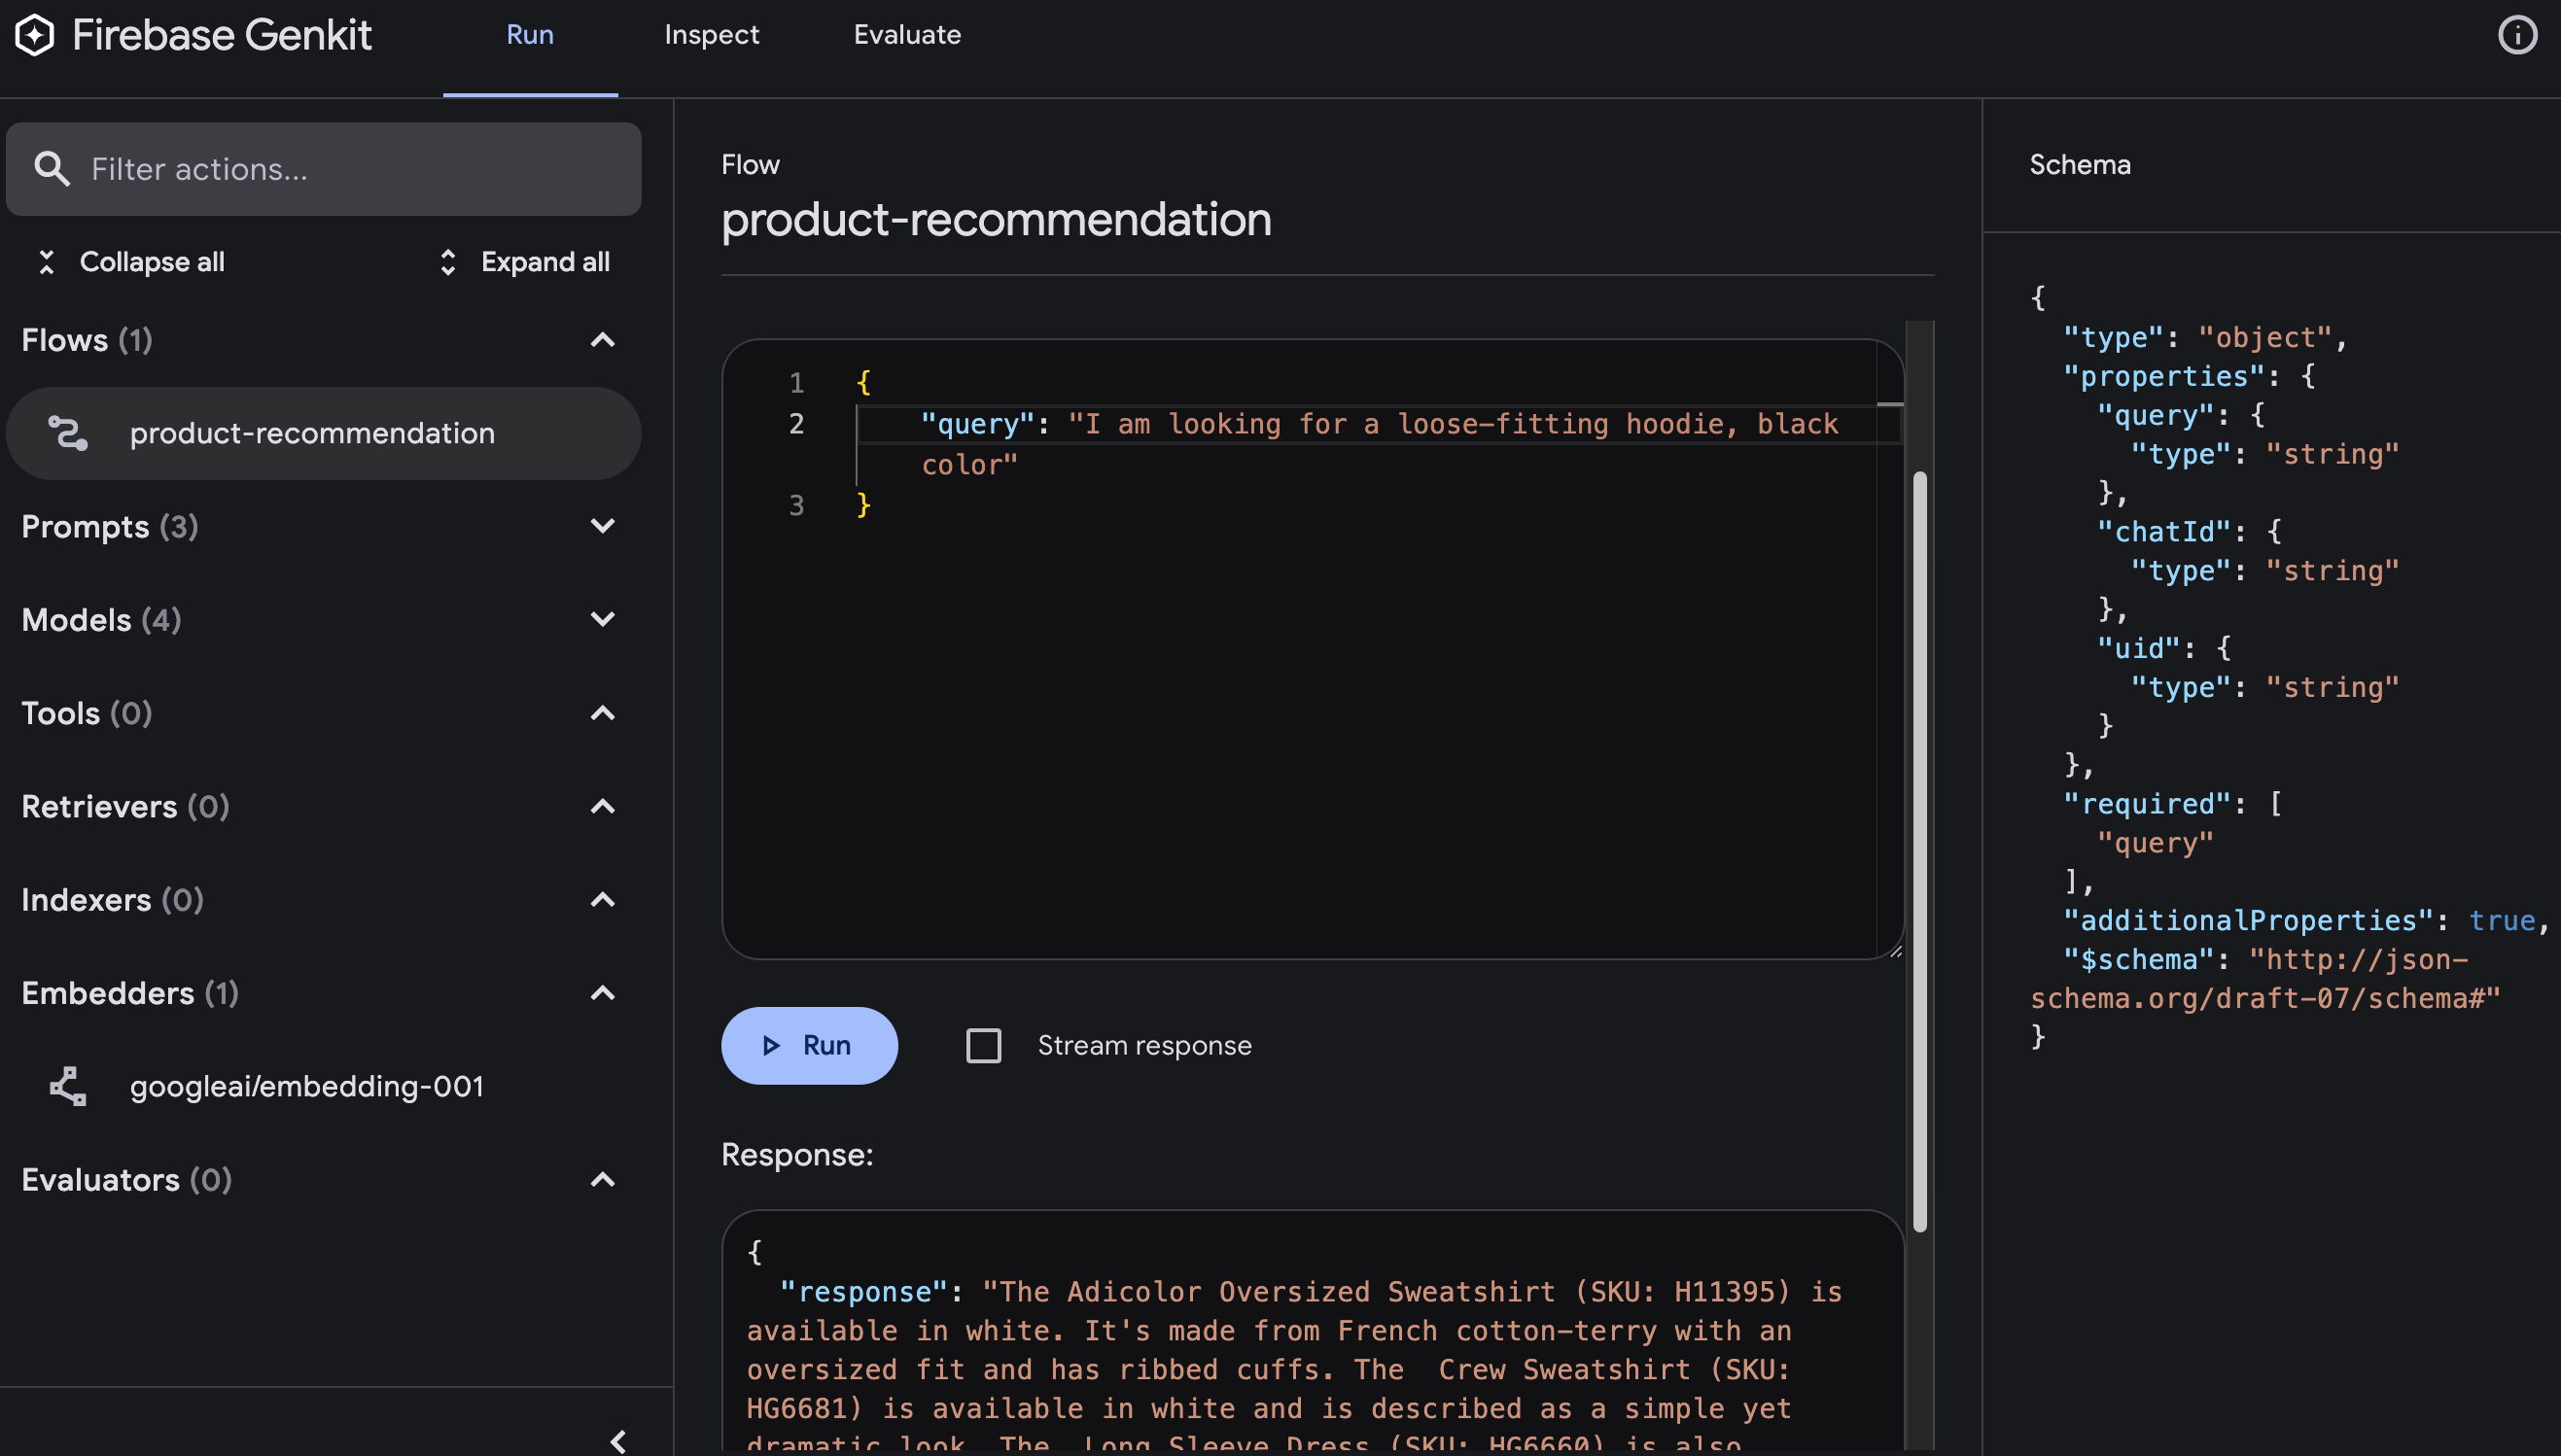
Genkit Developer UI
Testing from Terminal
You can also test the products-chat endpoint from the terminal. To test from the terminal first start the server.
npm run startClick here if you’re receiving the error - port 3400 already in use
By default, the server uses port 3400. If you get an error stating that port 3400 is already in use, you can manually configure the server to run on a different port by providing the port number in the serverConfig configuration option to the configureAndRunServer method.
// Run server on a specific port
configureAndRunServer({
  endpointConfigs: [productsChatEndpointConfig],
  serverConfig: {
    port: 3444
  }
});
Then from another terminal window, run the below curl command to send a POST request to the products-chat endpoint that we defined earlier.
curl -X POST "http://127.0.0.1:3400/products-chat" -H "Content-Type: application/json" -d '{ "data": { "query": "Could you suggest a shoe that mimics the shape of my foot?" } }'The above command points to the default http://127.0.0.1:3400 host and port. Remember to modify it if you are running the server on a different host and port. To change the port on which the server should run, you could provide the port number in the serverConfig configuration option to the configureAndRunServer method.
// Run server on a specific port
configureAndRunServer({
  endpointConfigs: [productsChatEndpointConfig],
  serverConfig: {
    port: 3444
  }
});
Test Chat History
To continue any conversation, all you have to do is provide the chatId that you received back in response to your first query. The chat endpoint configured with chat history uses this chatId to pull previous conversation messages and includes them in the query being sent to the LLM to generate the response.
Demo of an endpoint with support for chat history
Test Cache
On running the query for the first time, you will notice a bit of delay in response generation. This is expected, as we have to wait for the LLM to process the query and return the response. However, if submit the same query at least two times, any time that you submit the same query again, you should notice an instant response. This is because earlier we had set cacheQueryAfterThreshold of the cache store to 2, which essentially means that the response of a specific query will be stored in the cache when the same query is received a second time. So, if the same query is received after that, the cached response will be returned, instead of making the API call to the LLM and generating the response again.
This strategy helps optimize the cache storage and performance and at the same time reduces latency in response generation and increases the cost-effectiveness of the chat service. You can also modify for how long any response stays cached, by updating the recordExpiryDuration property of the cache store, which by default is 24 hours.
Demo of an endpoint with support for response caching
End of Tutorial
That’s it! Less than ten minutes and you have your very own chatbot that you can use to have conversations on your data. QvikChat provides all the underlying architecture and logic needed to support chat history, cache, RAG, and more, so that you can quickly get started with building and deploying chat services that are secure, performant, and reliable.
You check the complete source code for the above tutorial here: Products RAG Chat
Diving Deeper
For the curious-minded, here’s a brief overview of what’s happening behind the scenes.
On a high level, below is the process flow:
Chat endpoint is configured and deployed. For example, let’s say the endpoint is
/chat. If RAG is enabled and configured, an embedding model is used to generate embeddings, which are then stored in a vector store for retrieval when additional context information is needed for a query. For more info on how RAG is working, check the RAG Guide.User enters the query on the front-end chat interface, which is then sent by the front-end as a POST request to the chat service server at a specific endpoint (example,
/chat).Server executes the chat endpoint configured for the endpoint at which the request is received. This involves the validation of input data and the generation of response to the query. Depending on how the endpoint is configured, it may include authorizing the request based on the configured auth policy, retrieval of previous conversation messages to continue an old chat, response caching, or retrieval of additional context information required to answer the query (RAG). This may also involve the use of any tools that were set up with the endpoint.
Generated response is returned to the front-end.
Under the hood, QvikChat also uses specific system prompts that help ensure that the misuse and exploitation of the chat service can be deterred, this includes protection against prompt injection attacks and the mitigation of LLM hallucinations.
The below image gives a high-level overview of how an RAG query is handled (without auth, chat history, and cache), for an endpoint similar to the one we defined for product recommendation earlier.
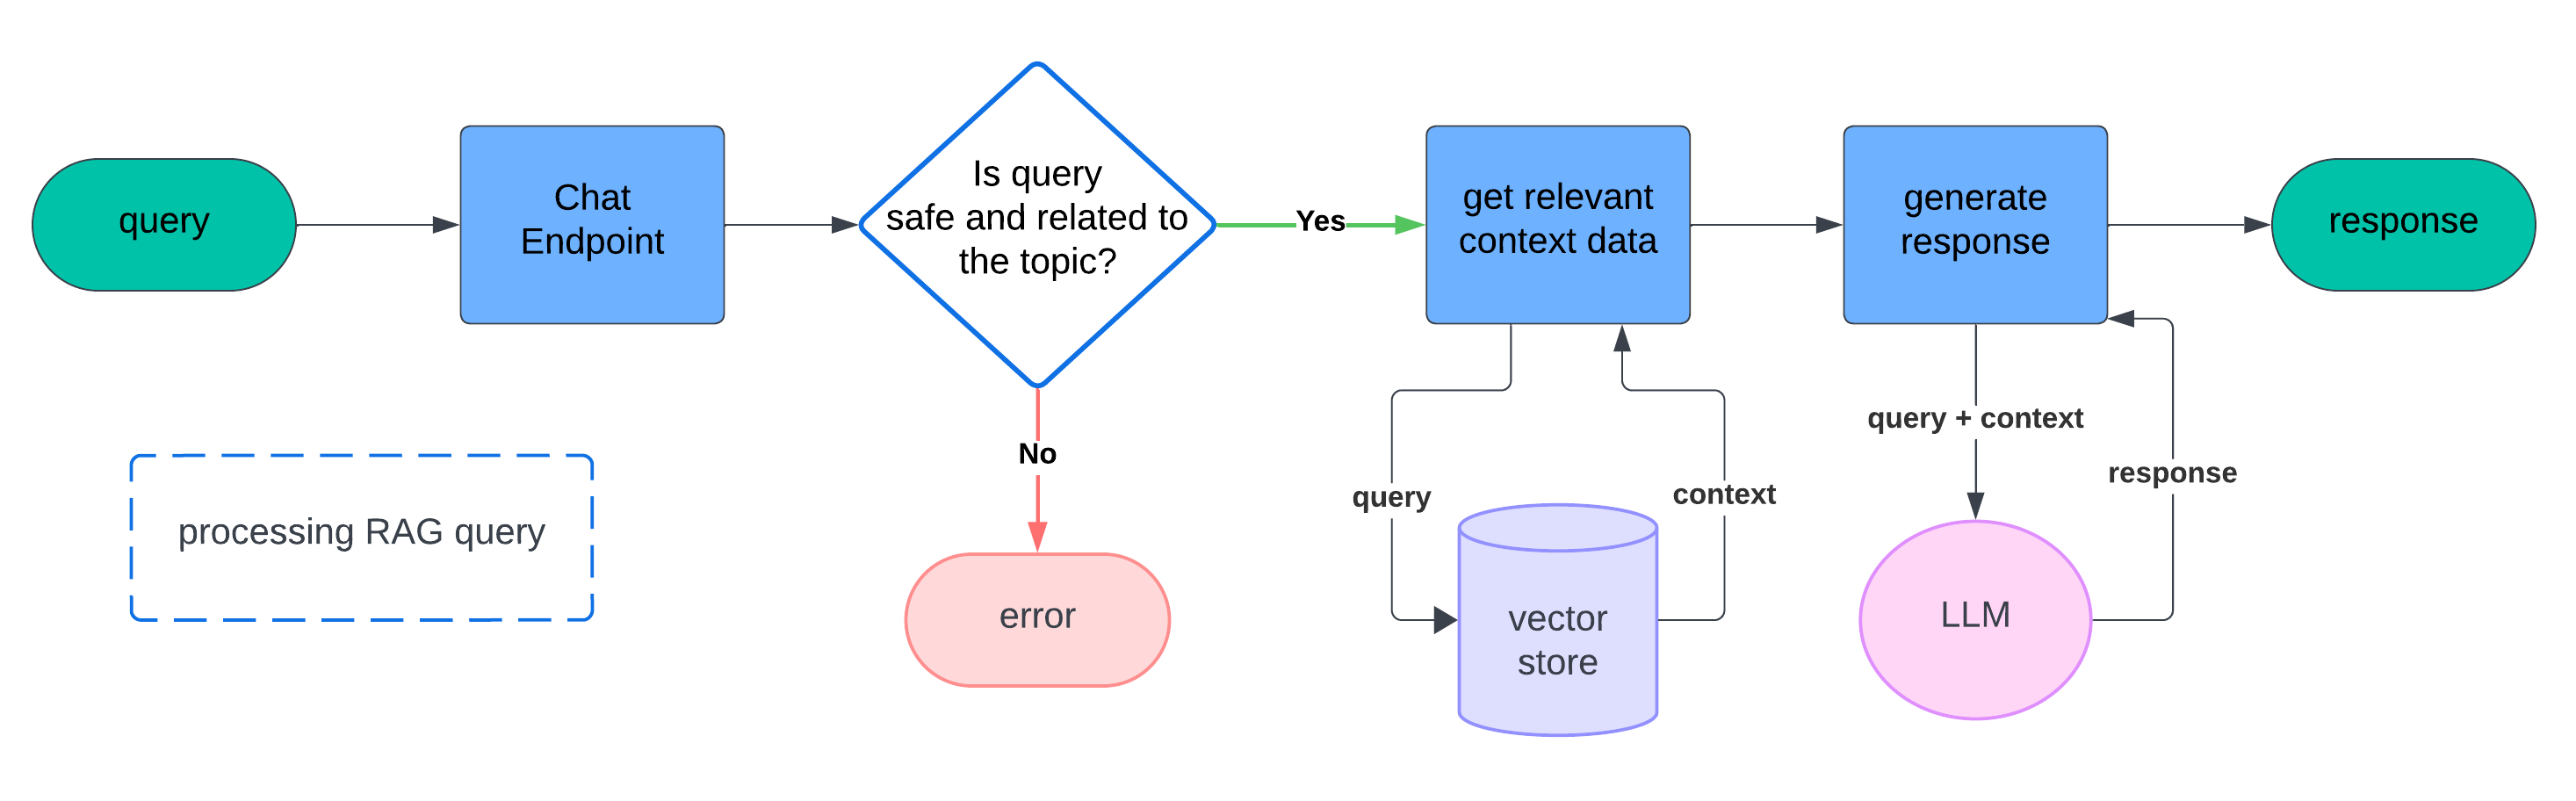
RAG Query Processing flow in QvikChat
What next?
Once you have your chat service endpoints deployed, you can easily use these endpoints in any of your front-end chat interfaces. All that needs to be done is sending and handling HTTP POST requests to the chat server.
If you don’t have a chat interface on the front-end yet, you could use any open-source chat component, like deep-chat, and configure it to use your chat server API.
Firebase Genkit Plugins
Given that QvikChat is built on top of Firebase Genkit, you can easily extend the functionality of QvikChat using any of the Genkit plugins. For example, you may want to add the Ollama plugin to use a self-hosted open-source LLM model. For more information on adding plugins and configuring Genkit with QvikChat, check the documentation on Genkit.
LangChain Integrations
Embedding Models: QvikChat uses the text-embedding-004 model through the Gemini API as the default embedding model for generating embedding for data when using RAG. You can easily use a custom embedding model by simply providing an instance of any LangChain-supported embedding model as the
embeddingModelwhen configuring an endpoint using theretrieverConfigor in the configuration parameters of thegetDataRetrievermethod. To learn more check Embedding Models.Vector Stores: By default, QvikChat uses an in-memory vector store, but you can easily provide an instance of any hosted vector store supported by LangChain (JS). For more information, check the documentation on Vector Store.
Data Loaders: Out of the box, QvikChat provides support for loading data from text, PDF, JSON, CSV, or a code of a supported programming language. However, if you want to load a file not supported by QvikChat by default, you can simply provide an instance of any LangChain-supported data loader as the
dataLoaderparameter to theretrieverConfigor in the configurations parameters of thegetDataRetrievermethod. For more info, check Data Loaders.
For all LangChain-related integrations supported by QvikChat, check LangChain.
Conclusion
I hope you found value in this tutorial on building a chat endpoint that supports chat history, cache, and RAG, using QvikChat. Whether it is adding a chat interface to a mobile app to help support customers or staff, or creating a completely self-hosted chat utility for engineers working in critical sector industries, QvikChat can enable you to create and deploy the backend chat endpoints quickly and efficiently, with out-of-the-box support for endpoint authentication, chat history, cache, and RAG, you can not only create powerful chat endpoints that use state-of-the-art large language models (LLMs) within a few minutes, but can also be sure that you don’t have to compromise on security for performance.
QvikChat is an open-source and community-driven project. All contributions and support to help improve and maintain QvikChat are gratefully welcomed. Check the QvikChat GitHub repo for more information.
To learn more about QvikChat you can check the official QvikChat documentation.
Keep exploring and keep the chat going! 🌟